Category Archives: Tutorial

DHCP snooping not working – multiple switches in path
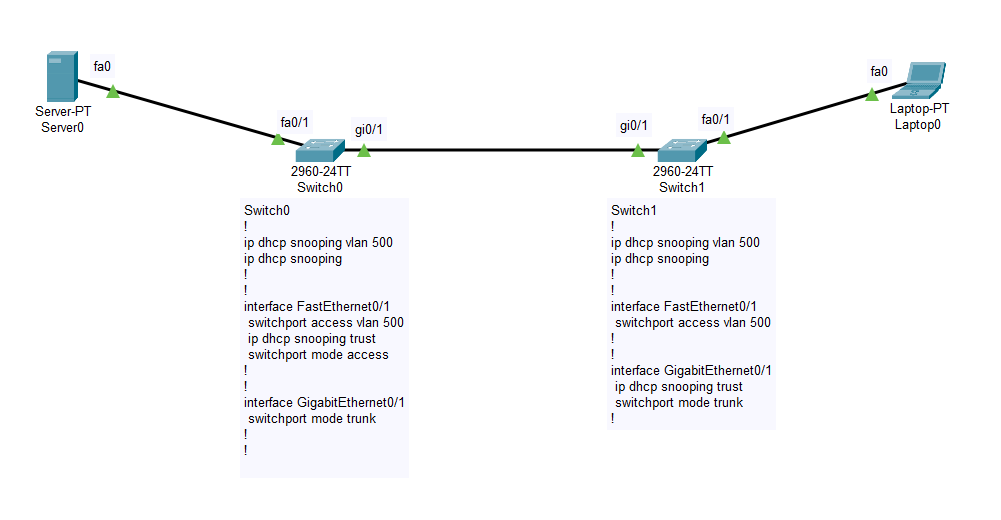
Lets look at this topology. The Server0 is configured with DHCP service and then it is connected to the Switch0 on port Fa0/1. This switch is connected to Switch1 from port Gi0/1 to Gi0/1. The laptop which is a DHCP client is connected to the Switch1 on Fa0/1.

dhcp snooping topology
Switch0
!
ip dhcp snooping vlan 500
ip dhcp snooping
!
!
interface FastEthernet0/1
 switchport access vlan 500
 ip dhcp snooping trust
 switchport mode access
!
!
interface GigabitEthernet0/1
 switchport mode trunk
!
!

Switch1
!
ip dhcp snooping vlan 500
ip dhcp snooping
!
!
interface FastEthernet0/1
 switchport access vlan 500
!
!
interface GigabitEthernet0/1
 ip dhcp snooping trust
 switchport mode trunk
!
services on Server0
DHCP request failed on the client

When the client is trying to get an address, it is not able to reach to the server because the cisco switches add option 82 by default to the DHCP requests and when that option is present on the packet, the other switches discard those packets with this message on the console

00:10:52: %DHCP_SNOOPING-5-DHCP_SNOOPING_NONZERO_GIADDR: DHCP_SNOOPING drop message with non-zero giaddr or option82 value on untrusted port, message type: DHCP RELEASE, MAC sa: 0005.5E80.090B

Here are three ways to fix this issue:

  1. Least secure which will open a security risk: To trust the Gi0/1 port on the Switch0.
Switch(config-if)#inter gi 0/1
Switch(config-if)#ip dhcp snooping trust
Switch(config-if)#
client got a valid ip address as a result of the above config

2. Somewhat better and safer: Disable the addition of option 82 on the DHCPREQUEST packets. This needs to be done on the switch where the end client is connected. In our case it is the Switch1

Switch1(config)#no ip dhcp snooping information option 
Switch1(config)#
Success on getting DHCP address assigned

3. The best option in my understanding: To allow the packets with option 82 make it to the DHCP server. We enable it on the upstream switch to allow DHCPREQUEST packets coming from untrusted ports. In our case we enable it on the Switch0

Switch0(config)#
Switch0(config)#ip dhcp snooping information option allow-untrusted
Switch0(config)#
DHCP success

I have attached the Cisco Packet Tracer file here. You can download the .pkt file for your tinkering pleasure.

ACME DNS-01 basic Autorenewing Script for txt records on dns.he.net

Options are limited when you want to generate a free Let’s Encrypt SSL certificate using WIN-ACME and you can not or do not want to publish verification files on the server – especially if you want the certificates to be auto-renewed. Also, I must mention that the SSL is for a wildcard domain.

I have domain records hosted on dns.he.net (Hurricane Electric) which is a free dynamic DNS provider and it has been very reliable for – I don’t even remember how many years. My aim is to generate a Let’s Encrypt SSL certificate and enable auto-renewal using DNS-01 verification from a script.

I should indicate that I am doing this on a Windows 2012 server machine not a linux machine.

First we will create a TXT record on HE portal, lower the time to live value and set the record type as dynamic.

Adding TXT Record on HE.NET for acme-challenge.

Once that is done, we will click on the refresh icon to setup our secret key which is used to authenticate valid requests.

Press the refresh/renew icon.
Type your desired key and click on Submit.

Now we will work on the server to create a very basic BAT script file.

@echo off
curl -4 "http://%1:Abcdef12345@dyn.dns.he.net/nic/update?hostname=%2&txt=%3"

Also, we will download curl from https://curl.se/windows/ and extract the contents to the root of the folder where we will keep our script file. I will probably be okay with the hardcoded secret key in the script as I have only 2 domains and I will use same key on both. If you have multiple domains then you may have to improvise on this part. I will not bother as it is okay for my needs.

Now it’s time to run the wacs.exe application and when it will ask for the domain validation method, I will select option 8 (at the time of writing this) which is the verification using your own script. When it will ask for the arguments, use these in this order:

{RecordName} {Identifier} {Token}

If you followed all the instructions as I stated, it will now succesfully validate and issue certificates. Its up to you how you want to install them as the wacs.exe script has good options for that too.

How to setup a lightweight Linux (Ubuntu) based SSH server

This is not a beginner level process so if you do not know why you would need an SSH server, this post is not for you. Now that is out of the way, let’s begin:

  1. Grab ISO for ubuntu server from here
  2. Install it on your hypervisor or physical machine if you are old school in that way.
  3. Install openssh server:
    1. Sudo apt-get update
    2. Sudo apt-get install openssh-server
  4. Enable and Start the SSH service
    1. Sudo systemctl enable ssh
    2. Sudo systemctl start ssh
    3. (to check it is running) sudo systemctl status ssh

[How To] Create Bootable Windows XP USB

Yesterday I ran into trouble while trying to install Windows XP on an old computer. The problem? Well I didn’t have a CD ROM drive on that computer and the only way to install was to use a bootable USB. I tried several well-known software tools available on the internet but somehow they didn’t work. May be because Windows XP was not designed to be USB bootable.

Finally I came across this amazing tool called rufus and it did it. The only other thing it needed was the ISO for Windows XP.

If you also want to make a Bootable Win XP USB, follow these steps:

Bootable WinXP USB
Howto Create Bootable USB Win XP

  1. Launch Rufus.
  2. Select your device from the drop down list.
  3. Click on the little CD Drive button and select the ISO file you want to use (Windows XP image)
  4. Hit Start button and off it goes.

Create Bootable USB Win XP

And you have your bootable Windows XP USB as simple as that.