Category Archives: General/Misc

DHCP snooping not working – multiple switches in path
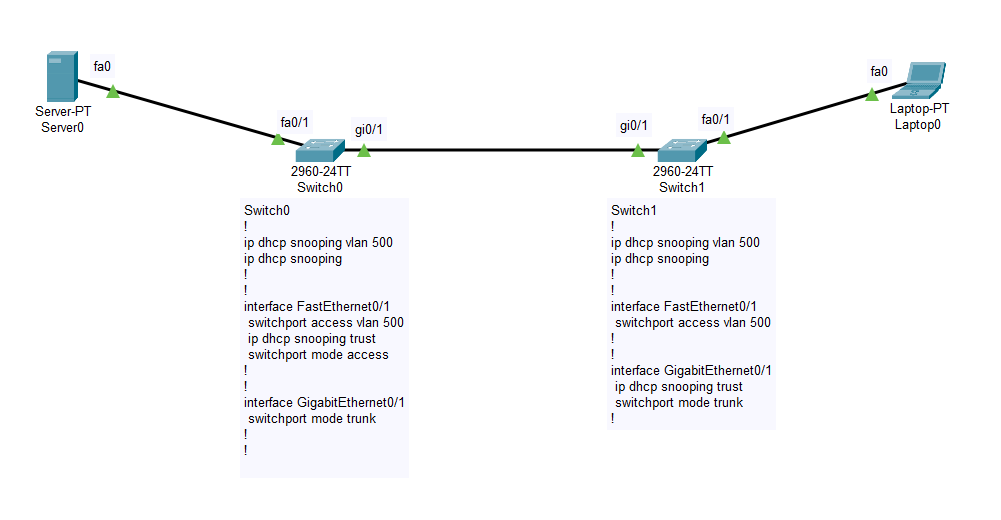
Lets look at this topology. The Server0 is configured with DHCP service and then it is connected to the Switch0 on port Fa0/1. This switch is connected to Switch1 from port Gi0/1 to Gi0/1. The laptop which is a DHCP client is connected to the Switch1 on Fa0/1.

dhcp snooping topology
Switch0
!
ip dhcp snooping vlan 500
ip dhcp snooping
!
!
interface FastEthernet0/1
 switchport access vlan 500
 ip dhcp snooping trust
 switchport mode access
!
!
interface GigabitEthernet0/1
 switchport mode trunk
!
!

Switch1
!
ip dhcp snooping vlan 500
ip dhcp snooping
!
!
interface FastEthernet0/1
 switchport access vlan 500
!
!
interface GigabitEthernet0/1
 ip dhcp snooping trust
 switchport mode trunk
!
services on Server0
DHCP request failed on the client

When the client is trying to get an address, it is not able to reach to the server because the cisco switches add option 82 by default to the DHCP requests and when that option is present on the packet, the other switches discard those packets with this message on the console

00:10:52: %DHCP_SNOOPING-5-DHCP_SNOOPING_NONZERO_GIADDR: DHCP_SNOOPING drop message with non-zero giaddr or option82 value on untrusted port, message type: DHCP RELEASE, MAC sa: 0005.5E80.090B

Here are three ways to fix this issue:

  1. Least secure which will open a security risk: To trust the Gi0/1 port on the Switch0.
Switch(config-if)#inter gi 0/1
Switch(config-if)#ip dhcp snooping trust
Switch(config-if)#
client got a valid ip address as a result of the above config

2. Somewhat better and safer: Disable the addition of option 82 on the DHCPREQUEST packets. This needs to be done on the switch where the end client is connected. In our case it is the Switch1

Switch1(config)#no ip dhcp snooping information option 
Switch1(config)#
Success on getting DHCP address assigned

3. The best option in my understanding: To allow the packets with option 82 make it to the DHCP server. We enable it on the upstream switch to allow DHCPREQUEST packets coming from untrusted ports. In our case we enable it on the Switch0

Switch0(config)#
Switch0(config)#ip dhcp snooping information option allow-untrusted
Switch0(config)#
DHCP success

I have attached the Cisco Packet Tracer file here. You can download the .pkt file for your tinkering pleasure.

Affordable 10gig home network!

Phew! Its been so busy for the past few weeks! Okay okay, past few months!

Alright, its been a few years! Okay?

Yes, I am posting after a few years today and I am so excited to share this wonderful resource I found while researching about 10gig home network. Yes, that’s right, a 10 gig home network is not so “out of reach” for enthusiasts these days especially when enterprise networks are now deployed on 40 or 100 gig speeds. That leaves a lot of working used networking gear up for grabs on our very own “eBay”. Anyways, what I wanted to share was this forum post written by fohdeesha in so much depth that you can easily make up your mind what device is best for you.

Ruckus ICX 6450-48P Switch
ICX 6450-48P Switch

I decided to get myself a Brocade ICX6450 which needs a licence to unlock 10Gig speed for two of its four SPF+ ports. Don’t sweat, fohdeesha has us covered for that aswell, just get registered on Servethehome.com and he will help you.

So, what are you waiting for, go get a 10Gig device and rise above the 1gig realm.

Setting up and accessing Rogers Hitron cable modem in bridge mode

If you are like me and want to have more control over your home network then chances are you also want to put your ISP modem in bridge mode so that your own router could be used as a gateway.

Here is how to setup your modem in bridge mode:

1.Go to the device home page.

2.Log in using the credentials mentioned on the little fold out received with the device.

3.Click on Basic and find the option saying GATEWAY and Disable it. Modem will reboot now and will have its Wifi and other router features disabled. You can now connect it to your router as WAN access.

Gateway setting in Hitron modem

Here is how to access it while it is in bridge mode:

You can access the modem while it is in bridge mode by opening http://192.168.100.1


[How To] Create Bootable Windows XP USB

Yesterday I ran into trouble while trying to install Windows XP on an old computer. The problem? Well I didn’t have a CD ROM drive on that computer and the only way to install was to use a bootable USB. I tried several well-known software tools available on the internet but somehow they didn’t work. May be because Windows XP was not designed to be USB bootable.

Finally I came across this amazing tool called rufus and it did it. The only other thing it needed was the ISO for Windows XP.

If you also want to make a Bootable Win XP USB, follow these steps:

Bootable WinXP USB
Howto Create Bootable USB Win XP

  1. Launch Rufus.
  2. Select your device from the drop down list.
  3. Click on the little CD Drive button and select the ISO file you want to use (Windows XP image)
  4. Hit Start button and off it goes.

Create Bootable USB Win XP

And you have your bootable Windows XP USB as simple as that.

How important to select the right stripe size for RAID-0

I was planning to setup RAID0 configuration for my lab machine and I was not sure which stipe size to go for especially in the world of SATA3 SSDs. But again, for a lab computer to install SSD will be overkill. I had all the questions in mind like What is the importance of selecting right stripe size, What is the correct stripe size, What should I set stripe size to, what should be the stripe size for raid0 configuration, Will there be a performance impact related to stripe size, What is the best stripe size for striping or what will be the best stripe size for raid0?

So I went an extra step and tried all the stripe sizes available to me and checked the transfer speeds (this is not the OS drive but a Data drive, the performance of the same configuration is little bit lower if used as the system drive – but is still better than single drive). Not only the right RAID stipe size but also the NTFS allocation unit size (shown below) also has effect on the volume transfer speed.

Choosing NTFS allocation unit size - devindersingh.ca
Choosing NTFS allocation unit size

Let me give an overview on these two things. For those of you who don’t know, setting up 2 or more hard drives in Raid 0, striping as it is called, is a bit of a risk since every thing which you save on the volume gets written on all the drives in parts. So, if one of the drives goes bad, all the data is lost. I would always use it for my lab machine as the data is not very important and critical and I do take daily backups.

What came out as a result was a sweet combination of the RAID0 stripe size and the NTFS allocation unit size (which we always leave at the default setting i.e. 4KB). Here is a list of hardware/software I used:

2 x 1TB SATA2 internal hard drives

Intel 41 chipset with ICH10R raid

Intel Quad core Q8300

16GB DDR3

Windows 7 x64 Ultimate

Intel rapid storage driver 11.7.0.1013

CrystalDiskMark 3.0.2 x64 (http://crystalmark.info/?lang=en) – for checking the transfer speeds

The drives are formatted and there is a single partition utilizing the whole space available.

I manually created the raid with different attributes for each test and collated the results in an excel file. Sharing it will be great idea as it might save someone trouble of doing the same thing for themselves. Here is the result:

Chart comparing various combinations of RAID stripe and NTFS allocation unit size - devindersingh.ca
Chart comparing various combinations

*All the data is in MBps

The value written as 4K-16K means 4K Raid stripe size and 16K NTFS allocation unit size. As you can see, for me the best combination for read and write speeds can be achieved by setting the Raid stripe size as 16K and NTFS unit as 8K, you want a different combination depending upon your needs. At the same time I would like to point out that your might get different outcome for a similar setup as it depends upon many other factors. This is just a basic idea to get started and I don’t have much experience in running benchmarks. I hope this will be helpful for someone. Please drop in your comments.

Acer D2D erecovery corrupt

At a client location, I had to reimage an old Acer desktop computer. Installing it traditionally using the CD would have taken hours and then finding and installing the drivers. ALT+F10 usually works on Acers for factory restore but was not working on this computer. I checked in the disk management and the recovery partition was there. Using Hiren’s Boot Disc, I was able to mount the partition and see the files in it. Then the question was how to use it to restore, after a deep search on google, I followed these steps to make D2D work and do a factory restore:

  1. Confirm if the recovery partition is still there by going to Control panel > Administrator tools > Computer management > Disk management (Sometimes, a reinstallation or an attempt to do so may corrupt the partition)
  2. Once the partition is there, you can use any of those partition mounting tools available on the internet to mount the recovery partition and see if you are able to browse through the files and folders and also try to copy a file to your C drive to double confirm that the partition is okay and not only showing ghost files.
  3. If all looks good, browse the root of the recovery partition and you should be able to see these two files: mbrwrwin.exe & rtmbr.bin
  4. Now that all seems good, launch CMD and go to the drive letter of the mounted partition and type: mbrwrwin.exe install rtmbr.bin and hit enter. It will take some time and you will see some activity on the CMD window once finish, you can restart the computer and use the D2D recovery console.
  5. Immediately after you see the ACER logo on the screen, press and hold the ALT key on the keyboard and start tapping F10 until you see the Acer recovery wizard. You can follow the on screen prompts to recover your computer to the factory settings. One important thing to keep in mind is that it will delete everything on the C drive so you may keep your data on the D drive.

**This method has been tried and tested personally by me on 20 dec 2012 and found to be working. Before this, ALT + F10 was not working but worked on the first try afterwards.

TimeClock Plus 4: Not allowing to edit time

We recently did a network upgrade where we upgraded from Windows server SBS 2003 to Windows server SBS 2011. Client was using TimeClock Plus 4 to manage employee attendance which was successfully moved to the new server. There was no problem in accessing the old data or pulling out any reports and users were able to punch in/out normally. The issue surfaced when the supervisor tried to manually update the timesheet for an employee and the system didn’t allow that. Timeclock works in client server configuration where the server application is installed on the server and the folder is shared so that users could install the client application and mark their timesheets which happens on the shared folder on the server.

After reinstalling and reconfiguring, it still didn’t work. Here is what was happening:

    • Supervisor was able to edit the timesheet when done on remote desktop of the server and the changes were showing while accessing it elsewhere.
    • Supervisor was not able to edit when opened from shared folder.
    • The network share permissions were given to everyone.

I figured out that somehow the software is not able to edit the files from any other machine but the server (where we were connecting using remote desktop and administrator account) so changing the NTFS permissions was worth a try and VOILA! it worked.

I was able to fix the issue by adding the windows username of the supervisor to security tab of the shared folder. The issue occurred as the user did have full Share rights but no NTFS rights.

AppAssure 5 – Intro

Dell purchased Appassure early this year and came up with Dell AppAssure 5 as the latest version with a name change from Replay to Dell Appassure. The one thing which would make it a preferred choice among other products in the same category is “Live Recovery“.
clip_image001
Live recovery empowers you to access the mission critical applications and data instantly while rest of the data is being recovered. What it means is, lets suppose somehow everything on your server or data store is lost. If you have had Appassure protection, you would be able to access all your data in minutes using this DR(Disaster recovery) solution. Now, you have access to 2 TB of data but it would take some time to copy it over to a new location since all the data is compressed and stored in its own patented container format. What if you need immediate access to your project files you were working on? Well, all you have to do is to start the recovery process and AppAssure will first show you the whole directory structure almost instantly and will start copying the actual data in the background. You can then navigate your way to the folder or the files you want and copy it to another location or launch it if its an executable file. AppAssure will recover that file/folder first and keep recovering the rest of the data in the background. You can very well imagine how useful this could prove to be in a situation like that.
I was so impressed with it that I registered myself on http://license.appassure.com and downloaded a trial to try my hands on it. I will add more articles regarding installation and implementation of AppAssure in coming days.

Image source: www.appassure.com