After extending the hard disk of the VM in ESXi or any other hypervisor, reboot the VM and boot using a bootable GPARTED iso image.
Before the extention, this VM has 200GB HDD which is almost full now
Once the GPARTED gui comes up, confirm that the free space is showing up and then select the partition which needs to be extended and use the slider to extend it my moving it towards right side. Then click on SAVE to write the changes. We are done here so we can now reboot the machine to claim the newly added space in the OS. If the disk is 100% used then the OS will not let you make/save any partition chanes to the disk which is counter intutive but that is how it is designed so when the OS is rebooted, press escape button on keyboard and then select advanced ubuntu startup options and drop to root shell. Once here, run apt-get clear && apt-get autoremove this will remove enough space to enable you to write changes to the disk.
GPARTED – extending the partitionReboot GPARTED
After the reboot, run these commands in this sequence to extend the volume.
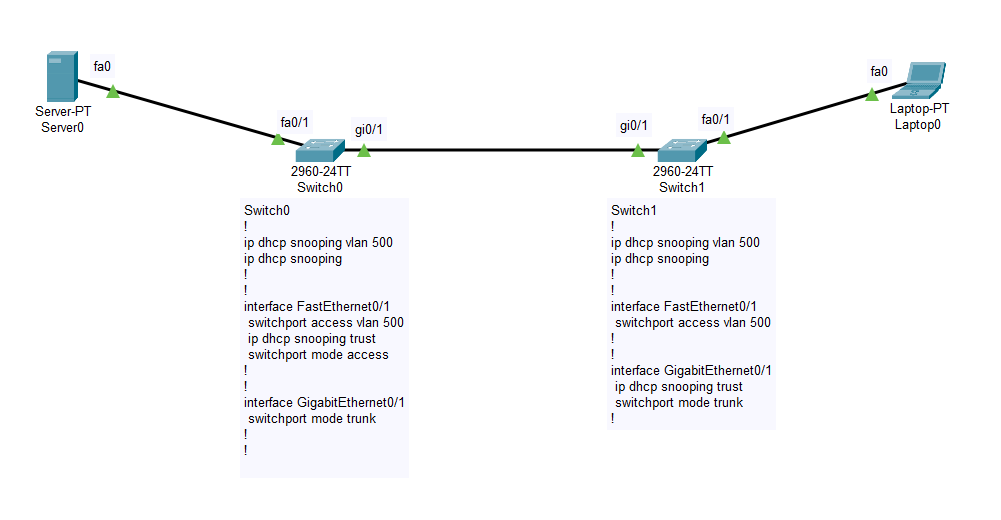
Lets look at this topology. The Server0 is configured with DHCP service and then it is connected to the Switch0 on port Fa0/1. This switch is connected to Switch1 from port Gi0/1 to Gi0/1. The laptop which is a DHCP client is connected to the Switch1 on Fa0/1.
services on Server0DHCP request failed on the client
When the client is trying to get an address, it is not able to reach to the server because the cisco switches add option 82 by default to the DHCP requests and when that option is present on the packet, the other switches discard those packets with this message on the console
00:10:52: %DHCP_SNOOPING-5-DHCP_SNOOPING_NONZERO_GIADDR: DHCP_SNOOPING drop message with non-zero giaddr or option82 value on untrusted port, message type: DHCP RELEASE, MAC sa: 0005.5E80.090B
Here are three ways to fix this issue:
Least secure which will open a security risk: To trust the Gi0/1 port on the Switch0.
Switch(config-if)#inter gi 0/1
Switch(config-if)#ip dhcp snooping trust
Switch(config-if)#
client got a valid ip address as a result of the above config
2. Somewhat better and safer: Disable the addition of option 82 on the DHCPREQUEST packets. This needs to be done on the switch where the end client is connected. In our case it is the Switch1
Switch1(config)#no ip dhcp snooping information option
Switch1(config)#
Success on getting DHCP address assigned
3. The best option in my understanding: To allow the packets with option 82 make it to the DHCP server. We enable it on the upstream switch to allow DHCPREQUEST packets coming from untrusted ports. In our case we enable it on the Switch0
Switch0(config)#
Switch0(config)#ip dhcp snooping information option allow-untrusted
Switch0(config)#
DHCP success
I have attached the Cisco Packet Tracer file here. You can download the .pkt file for your tinkering pleasure.
Options are limited when you want to generate a free Let’s Encrypt SSL certificate using WIN-ACME and you can not or do not want to publish verification files on the server – especially if you want the certificates to be auto-renewed. Also, I must mention that the SSL is for a wildcard domain.
I have domain records hosted on dns.he.net (Hurricane Electric) which is a free dynamic DNS provider and it has been very reliable for – I don’t even remember how many years. My aim is to generate a Let’s Encrypt SSL certificate and enable auto-renewal using DNS-01 verification from a script.
I should indicate that I am doing this on a Windows 2012 server machine not a linux machine.
First we will create a TXT record on HE portal, lower the time to live value and set the record type as dynamic.
Adding TXT Record on HE.NET for acme-challenge.
Once that is done, we will click on the refresh icon to setup our secret key which is used to authenticate valid requests.
Press the refresh/renew icon.Type your desired key and click on Submit.
Now we will work on the server to create a very basic BAT script file.
@echo off
curl -4 "http://%1:Abcdef12345@dyn.dns.he.net/nic/update?hostname=%2&txt=%3"
Also, we will download curl from https://curl.se/windows/ and extract the contents to the root of the folder where we will keep our script file. I will probably be okay with the hardcoded secret key in the script as I have only 2 domains and I will use same key on both. If you have multiple domains then you may have to improvise on this part. I will not bother as it is okay for my needs.
Now it’s time to run the wacs.exe application and when it will ask for the domain validation method, I will select option 8 (at the time of writing this) which is the verification using your own script. When it will ask for the arguments, use these in this order:
{RecordName} {Identifier} {Token}
If you followed all the instructions as I stated, it will now succesfully validate and issue certificates. Its up to you how you want to install them as the wacs.exe script has good options for that too.
This is something Advanced level so if you are a beginner, try to follow along and I will try to explain it in the easiest to understand way.
Why do we need SSH tunneling? Well, for me it makes it quite easy to manage the services from my private network to be available from the internet. All I need to do on my firewall is open or forward an open port to the SSH listening port on my SSH server. If you want to setup your SSH server, you may want to take a look at my other post.
In this post I will try to explain how to use RDP over SSH Tunnel. The idea is to access the RDP service on a Windows host from another computer without connecting to the RDP service port (by default 3389) using a SSH tunnel provided by an SSH server.
I am using PUTTY here.
On the Client, open putty and scroll down on the left side and click on the + sign next to SSH to select Tunnels. Enter a port number higher than 1024 here which should not be same as any other running service on your (client) computer. I chose 2222 here and then enter the ip address of the host computer where you want to connect through tunnel (10.0.0.100 port 3389 providing RDP in our example) then click ADD.
Now it should appear in the box above so scroll up on the left and click on Session.
Now enter the ip address of the SSH server (10.0.0.2 and port 22 in our example) and click on OPEN.
In the terminal window which just opened, enter the username and password for the SSH Server and keep it open.
Now open mstsc.exe on your computer and use the localhost as the ip and 2222 (the one we chose in step 1) as the port and click on connect. You should see the login window and that’s it.
Just remember to keep the Putty window open else the tunnel will drop and you will have to re-establish the connection. Have fun.
This is not a beginner level process so if you do not know why you would need an SSH server, this post is not for you. Now that is out of the way, let’s begin:
Phew! Its been so busy for the past few weeks! Okay okay,
past few months!
Alright, its been a few years! Okay?
Yes, I am posting after a few years today and I am so excited to share this wonderful resource I found while researching about 10gig home network. Yes, that’s right, a 10 gig home network is not so “out of reach” for enthusiasts these days especially when enterprise networks are now deployed on 40 or 100 gig speeds. That leaves a lot of working used networking gear up for grabs on our very own “eBay”. Anyways, what I wanted to share was this forum post written by fohdeesha in so much depth that you can easily make up your mind what device is best for you.
ICX 6450-48P Switch
I decided to get myself a Brocade ICX6450 which needs a licence to unlock 10Gig speed for two of its four SPF+ ports. Don’t sweat, fohdeesha has us covered for that aswell, just get registered on Servethehome.com and he will help you.
So, what are you waiting for, go get a 10Gig device and rise
above the 1gig realm.
If you are like me and want to have more control over your home network then chances are you also want to put your ISP modem in bridge mode so that your own router could be used as a gateway.
Here is how to setup your modem in bridge mode:
1.Go to the device home page.
2.Log in using the credentials mentioned on the little fold out received with the device.
3.Click on Basic and find the option saying GATEWAY and Disable it. Modem will reboot now and will have its Wifi and other router features disabled. You can now connect it to your router as WAN access.
Gateway setting in Hitron modem
Here is how to access it while it is in bridge mode:
You can access the modem while it is in bridge mode by opening http://192.168.100.1
Yesterday I ran into trouble while trying to install Windows XP on an old computer. The problem? Well I didn’t have a CD ROM drive on that computer and the only way to install was to use a bootable USB. I tried several well-known software tools available on the internet but somehow they didn’t work. May be because Windows XP was not designed to be USB bootable.
Finally I came across this amazing tool called rufus and it did it. The only other thing it needed was the ISO for Windows XP.
If you also want to make a Bootable Win XP USB, follow these steps:
I was planning to setup RAID0 configuration for my lab machine and I was not sure which stipe size to go for especially in the world of SATA3 SSDs. But again, for a lab computer to install SSD will be overkill. I had all the questions in mind like What is the importance of selecting right stripe size, What is the correct stripe size, What should I set stripe size to, what should be the stripe size for raid0 configuration, Will there be a performance impact related to stripe size, What is the best stripe size for striping or what will be the best stripe size for raid0?
So I went an extra step and tried all the stripe sizes available to me and checked the transfer speeds (this is not the OS drive but a Data drive, the performance of the same configuration is little bit lower if used as the system drive – but is still better than single drive). Not only the right RAID stipe size but also the NTFS allocation unit size (shown below) also has effect on the volume transfer speed.
Choosing NTFS allocation unit size
Let me give an overview on these two things. For those of you who don’t know, setting up 2 or more hard drives in Raid 0, striping as it is called, is a bit of a risk since every thing which you save on the volume gets written on all the drives in parts. So, if one of the drives goes bad, all the data is lost. I would always use it for my lab machine as the data is not very important and critical and I do take daily backups.
What came out as a result was a sweet combination of the RAID0 stripe size and the NTFS allocation unit size (which we always leave at the default setting i.e. 4KB). Here is a list of hardware/software I used:
The drives are formatted and there is a single partition utilizing the whole space available.
—
I manually created the raid with different attributes for each test and collated the results in an excel file. Sharing it will be great idea as it might save someone trouble of doing the same thing for themselves. Here is the result:
Chart comparing various combinations
*All the data is in MBps
The value written as 4K-16K means 4K Raid stripe size and 16K NTFS allocation unit size. As you can see, for me the best combination for read and write speeds can be achieved by setting the Raid stripe size as 16K and NTFS unit as 8K, you want a different combination depending upon your needs. At the same time I would like to point out that your might get different outcome for a similar setup as it depends upon many other factors. This is just a basic idea to get started and I don’t have much experience in running benchmarks. I hope this will be helpful for someone. Please drop in your comments.
Perform the Powershell commands on Exchange management shell as mentioned in the install notes for BES (here)
Do login with the user which has been created for the Blackberry service “BESadmin”
Run the installation and it will tell you what login you are using.
BES Installation start screen
Put in the information on EULA screen.
BES EULA screen
We will select the first option here as it is a new installation.
BES Select setup type screen
Next we will select the option Blackberry Enterprise Server and leave the defaults selected.
BES select setup options screen
Now it will run a check and make a preinstall checklist, if the MAPI package is not install, it will give you an error like this one:
BES preinstall checklist
If you have already install then it should be all okay and we can click on Next. Now it will give us an option to install SQL server 2005 Express if no other database is going to be used. Some of us might have to select the other option in case there is already another SQL server which is going to be used instead. For this tutorial we will however use the default option.
BES Database type screen
Now it will need us to provide the password for BESadmin account that we created and also we need to name the server in the bottom most field. Note that once a name is provided and we hit next, it is not easy to change this name by coming back as it turns gray. On next few screens we just need to click Next as it installs the necessary items and SQL server.
BES accounts and folders screen
BES Install summary screen
BES Install progress screen
BES installation complete
BES post-installation restart confirmation
After the restart, installation will start automatically and it will create a database for the itself and since SQL is installed on the same machine, we will select the location as local.
BES database creation dialogue
BES Database information
Now we need to provide the information which becomes available after registering to download the BES installation file. Put in the information and click Next.
BES enter license information screen
We need to provide the exchange account information once again where it will check if the associated account has all the permissions as discussed in starting section of this tutorial.
BES Exchange information entry screen
Provide a password for SSL certificate and take a note of it.
BES Administrative settings screen
BES select user name and password scren
We will use the local Blackberry Administration Service authentication as the Active directory authentication doesn’t work sometimes. You may use it if you want.
BES Admin account selection
Clicking next will start setting up the server and a summary screen will be shown at end. Click on Start services button to make the server functional or it will automatically start upon a restart.
BES Final summary screen
It will give the links to access the Desktop and Admin management control pages along with an option to export the information to a file which will be handy in the future.
BES Installation completion screen
That concludes the installation of BES express in Windows Server environment. Creation and management of users will be discussed in another post.